Git- Distributed Version Control System Part-1
What is a Version Control System (VCS)?
A Version Control System (VCS) is a software tool that helps developers track and manage changes to code or files over time.
Git distributed version control is a powerful system that allows developers to work collaboratively, manage branches, and track changes efficiently.
It keeps a history of every change, so you can:
-
Collaborate with others
-
Revert to previous versions
-
Compare changes between versions
-
Track who made what change and when
Two Main Types of VCS:
| Type | Description |
|---|---|
| Local VCS | Stores versions on the developer’s local system (e.g., RCS) |
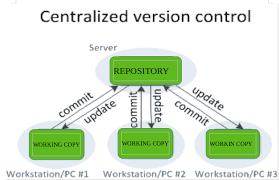
| Centralized VCS | One central server for all version history (e.g., SVN, CVS) |
| Distributed VCS | Every user has a copy of the full history (e.g., Git, Mercurial) |
Popular Version Control System Tools:
-
Git (most widely used)
-
GitHub / GitLab / Bitbucket (cloud-based Git repositories)
-
SVN (Subversion)
-
Mercurial
Example Scenario:
Suppose you are building a website. You:
-
Add a new feature → commit the change.
-
Break something → revert to an earlier version.
-
Collaborate with a team → track each contributor’s changes.
Benefits of Using VCS:
-
Prevents code loss
-
Enables team collaboration
-
Maintains a clean history
-
Supports branching and merging
-
Essential for DevOps, CI/CD, and Agile development
What is Git?
Git is a free and open-source distributed version control system that helps you track changes in your code, collaborate with others, and manage projects efficiently.
In simple terms, Git distributed version control ensures that teams can work on multiple features simultaneously without overwriting each other’s changes. It provides a robust history of all changes, making it easy to revert mistakes or understand the evolution of a project.
Git is a free and open-source distributed version control system that helps developers track and manage changes in their code. Unlike traditional centralized version control systems, Git distributed version control allows every developer to have a full copy of the project history, enabling collaboration without relying on a central server all the time.
With Git distributed version control, you can:
-
Track changes efficiently: Every modification to the code is recorded, making it easy to review the history of a project.
-
Collaborate with multiple developers: Teams can work on different features simultaneously without overwriting each other’s work.
-
Revert mistakes easily: If an error occurs, you can quickly revert to a previous stable version.
-
Manage branches and merges: Git allows creating branches for new features or experiments and merging them safely into the main project.

Step-by-Step: Git Installation (Windows)

Step 1: Download Git
-
Go to the official Git website:
👉 https://git-scm.com/downloads -
Click on “Download for Windows”
It will automatically download the.exefile.
Step 2: Run the Installer
-
Double-click the downloaded
.exefile to launch the Git Setup Wizard. -
Click Next through the default options unless you want custom settings.
Key setup options you can leave as default:
-
Select components: ✅ Git Bash, ✅ Git GUI
-
Editor: Use Notepad++ or default Vim
-
PATH environment: Choose “Git from the command line”
-
HTTPS transport backend: ✅ Use OpenSSL
-
Line endings: Choose “Checkout Windows-style, commit Unix-style line endings”
Then click Install.
Step 3: Finish Installation
-
Once the installation is complete, click Finish.
-
Git is now installed!
Step 4: Verify Installation
Open Command Prompt or Git Bash and type:
git --version
You should see output like:
git version 2.43.0.windows.1
Git Installation on Linux (Ubuntu/Debian)
Open Terminal and run:
sudo apt update

sudo apt install git

git --version
Git Installation on macOS
Use Homebrew:
brew install git

git --version
Optional: Configure Git (Important!)
After installation, run these commands to set your name and email:
git config --global user.name "Your Name"

git config --global user.email "you@example.com"
Create a Git-hub account
What is GitHub?
GitHub is a platform where developers store, manage, and share code. It uses Git (a version control system) and allows collaboration on coding projects from anywhere.
GitHub is a web-based platform that uses Git distributed version control to help developers store, manage, and share their code efficiently. It allows multiple developers to collaborate on projects from anywhere in the world, making teamwork seamless and organized.
Using Git distributed version control with GitHub, you can:
-
Host repositories remotely: Store your project online so your team can access it anytime.
-
Collaborate with others: Multiple developers can work on the same project, submit changes, and review contributions.
-
Track changes and history: GitHub keeps a detailed history of commits, showing who made what changes and when.
-
Create branches and pull requests: Branches allow experimentation without affecting the main project. Pull requests let team members review and approve changes.
Benefits of Using GitHub with Git Distributed Version Control
How to Create a GitHub Account
Go to GitHub Website
-
Open your browser and visit:
👉 https://github.com
Click on “Sign Up”
-
On the top-right corner, click the Sign Up button.
Enter Your Details
You’ll be asked to fill out a form:
-
Username: Choose a unique username (e.g.,
karishmadev01) -
Email address: Use a valid email you can access
-
Password: Create a strong password (at least 8 characters)
Make sure to use a professional username if you’re using it for jobs or projects.
Verify Your Account
-
GitHub may ask you to solve a puzzle (to confirm you’re human)
-
Then, verify your email by clicking the link sent to your inbox.
Choose Plan
-
Select the Free Plan (it’s more than enough for learning and projects)
-
Click Continue.
Set Up Your Preferences (Optional)
-
GitHub might ask a few questions like your experience level or what you’ll use GitHub for.
You can skip or answer based on your interest.
Welcome to GitHub Dashboard!
You’ll now land on your GitHub dashboard, where you can:
-
Create Repositories (projects)
-
Fork and clone others’ code
-
Manage and share your code
Next Step: Create Your First Repository
Once your account is ready, click:
👉 + (top-right) → New repository
Give it a name and click Create repository.
Vagrant Git- Distributed Version Control System Part- 2 Previous Next