
In this tutorial, we explore powerful techniques for seamless automation that go beyond the basics. It focuses on securing credentials with organizing inventory files, writing clean YAML syntax, using the file and template modules effectively and customizing output colors.
File Module
file module deals with file/directory-related operations.
Example :-
Change file permission and ownership
Playbook: fileper.yaml
---
 - name: play for file module
   hosts: webservers
   tasks:
      - name: Change file permssion
        file:
           path: /tmp/foo.conf
           owner: vagrant
           group: vagrant
           mode: 0644
Inventory file
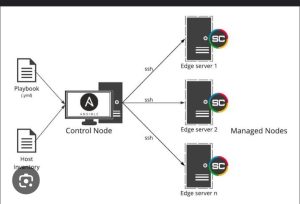
An controller needs a list of hosts and groups of hosts upon which commands, modules, and tasks are performed on the managed nodes, this list is known as inventory. It may contain information such as – Host IPs, DNS Name, SSH User and Pass, SSH Port service info (in case it is other than port 22). The most common formats are INI and YAML. An inventory file is also sometimes called a host file. We will be using INI format in this guide.
Common syntax
[webservers]
10.0.0.9
10.0.0.10
[dbservers]
10.0.0.11
10.0.0.12
Alias Name
webserver01 ansible_host=10.0.0.9
[webservers]
webserver01
Creating custom inventory file
Group InventoryFile
Yaml – Syntax
1. Key Value pair
name: Ansible
Version: 2.3.4
2. Array or collection
ConfigurationManagement:
– Ansible
– Puppet
– Chef
– SaltStack
– Terraform
3. Dictionary
Ansible:
commands: Adhoc
Script: Playbooks
Puppet:
commands: PuppetCommands
script: Manifest
4. Dictionary In the dictionary
Ansible:
commands:
type: Adhoc
SingleLine: True
5. List of Dictionary
ConfigurationManagement:
–
name: Ansible
model: Push
–
name: Puppet
model: Pull
Template Module
It puts the files onto a remote system using jinja2 templating language.
Example: Template a single file
Step 1: Create a file called my_app.conf.j2 and add below content
env = {{ env }}
local_id = {{ ansible_host }}
local_OSFamily = {{ ansible_facts[‘os_family’] }}
local_OS = {{ ansible_distribution }}
Step 2: Create a ansible play book lets call it template.yaml
—
– name: Parsing Jinja2 templates
hosts: “*”
vars:
env: staging
tasks:
– name: template file onto remote hosts
template:
src: my_app.conf.j2
dest: /tmp/myconfigfile
Example Set Permission for parsed jinja file
—
– name: Parsing Jinja2 templates
hosts: “*”
vars:
env: staging
tasks:
– name: template file onto remote hosts
template:
src: my_app.conf.j2
dest: /tmp/myconfigfile
– name: change the permission for the parsed jinja file
file:
path: /tmp/myconfigfile
owner: raman
mode: ‘0600’
Example Template Multiple files.
Create one more .j2 file let’s say my_host.conf.j2
and write following content
OS = {{ ansible_distribution }}
Create a template.yaml file
—
– name: Parsing Jinja2 templates
hosts: “*”
vars:
env: staging
tasks:
– name: template file onto remote hosts
template:
src: ‘{{ item.src }}’
dest: ‘{{ item.dest }}’
with_items:
– { src: my_app.conf.j2, dest: /tmp/myconfigfile }
– { src: my_host.conf.j2, dest: /tmp/myhostconfigfile}
– name: change the permission for the parsed jinja file
file:
path: /tmp/myconfigfile
owner: raman
mode: ‘0600’
Output Color
Green:- Command or Playbook is executed successfully and there is no state change. For example, if you want to install apache on a server and apache is already installed on that server then the output will be in green color.
Yellow:- Command or Playbook is executed successfully and there is a state change. For example, if you want to install apache on a server and apache is not installed on that server then the output will be in yellow color.
Red:- It represents run time errors or syntax or compilation errors. For example, if you want to create a file in a directory but that directory does not exist then it will give a run time exception in Red Color. if you have some syntax error in the code then the output will be Red color which indicates that there is some error in the code.
Pink:- It represents the warning which sometimes we ignore it if it is not major.
For more details visit DevOps World for in-depth guides and resources on automation and DevOps best practices.