
Docker Part-3
Continue learning Docker Part-3 in this advanced guide. Explore branching, merging, and squashing with real-world Git workflow examples.
Storage
Docker Storage is how manages data inside containers. By default, data created inside a container is ephemeral (temporary) and is lost when the container is deleted. To persist data, container time provides different types of storage mechanisms.
Types of Docker Storage:
1. Volumes (Most Recommended)
-
Stored outside the container’s writable layer.
-
Survive container removal.
-
Easily shared between multiple containers.
-
Best for persistent data like databases.
2. Bind Mounts
-
Maps a host directory to a container directory.
-
Offers direct access to host file system.
-
Useful in development and debugging.
3. tmpfs Mounts
-
Stores data in memory only (RAM), not written to disk.
-
Fast, but non-persistent.
-
Ideal for temporary or sensitive data.
Comparison Table:
| Feature | Volumes | Bind Mounts | tmpfs |
|---|---|---|---|
| Managed by Docker | Yes | No | Yes |
| Persistent | Yes | Yes | No (RAM only) |
| Performance | Good | Varies | Fastest |
| Portability | High | Low | Not Applicable |
| Use Case | Prod data, DB | Dev/debug | Temp/sensitive |
Real-world Use Case:
If you’re running a MySQL container, you want to persist the database files:
Docker Networking
Docker networking allows containers to communicate with each other, the host system, and the outside world. It is essential for building multi-container applications and for connecting containers securely and efficiently.
Why Networking?
-
To communicate between containers
-
To expose services to the outside world
-
To create isolated environments (like virtual networks)

Types of Networks
1. Bridge Network (Default for standalone containers)
-
Default network for containers.
-
Used when you don’t explicitly specify a network.
-
Allows containers to communicate on the same host using IP or container names.
-
Suitable for apps running on a single host.
2. Host Network
-
Removes the network isolation between container and host.
-
Container shares the host’s network stack (IP address and ports).
-
Faster but less secure.
-
Used when you need maximum performance or direct access to the host.
Example:
bashcontainer runtime run --network host nginx
3. None Network
-
Disables all networking.
-
Container has no network access.
-
Useful for security or isolated testing.
Example:
bashcontainer runtime run --network none alpine
4. Custom Bridge Network (Recommended for multi-container apps)
-
User-defined bridge network.
-
Containers can communicate by name instead of IP.
-
More control and name resolution via internal DNS.
Example:
bashcontainer runtime network create mynet
container runtime run -d --name web1 --network mynet nginx
container runtime run -it --name client --network mynet alpine
# You can ping web1 from client
5. Overlay Network (For Swarm / multi-host)
-
Used in container runtime Swarm to connect containers across different hosts.
-
Useful for distributed applications.
Example:
bashcontainer runtime swarm init
container runtime network create -d overlay myoverlay
Real-World Use Case:
Running a Node.js app and a MongoDB container:
bashcontainer runtime network create app-net
container runtime run -d --name mongo --network app-net mongo
container runtime run -d --name nodeapp --network app-net node-app-imag
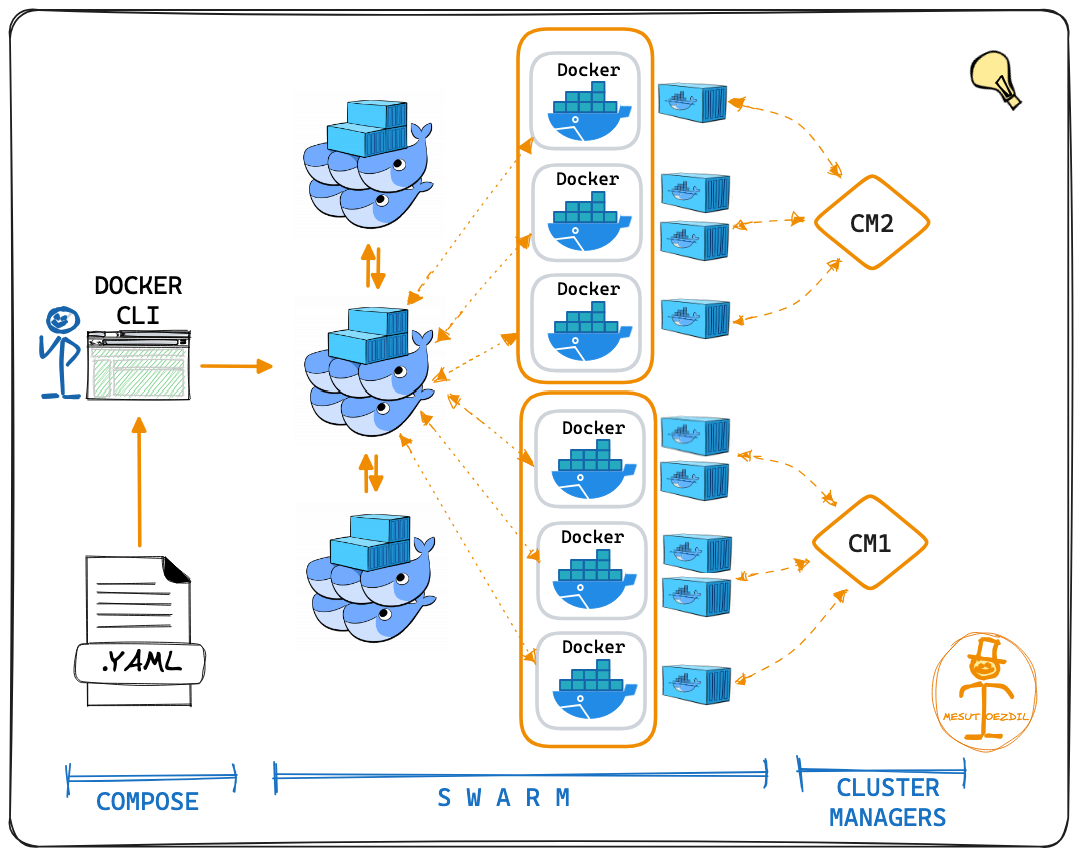
Container runtime Compose is a tool for defining and running multi-container runtime applications using a simple YAML file.

Use :
-
Run multiple containers (like web + database) together.
-
Define networks, volumes, environment variables, and services in one file.
-
Easily run your app using one command:
container runtime-compose up
Key Concepts
-
Each service represents a container (like a web server, DB, etc.).
-
You can define:
-
Images
-
Build instructions
-
Ports
-
Volumes
-
Environment variables
-
Networks
-
Example
Let’s say you want to run a Node.js app with MongoDB.
yaml
version: '3.8'
services:
web:
image: node-app
ports:
– “3000:3000”
depends_on:
– mongo
environment:
– MONGO_URL=mongodb://mongo:27017/mydb
mongo:
image: mongo
volumes:
– mongo-data:/data/db
volumes:
mongo-data:
How to Use :
1. Create a docker-compose.yml file in your project folder.
2. Run the application:
bashdocker-compose up
3. Run in the background (detached mode):
bashdocker-compose up -d
4. Stop the application:
bashdocker-compose down
Compose File Sections Explained
| Section | Purpose |
|---|---|
version |
Docker Compose file format version |
services |
Define each container (e.g., web, db) |
build |
Build the image from file (optional) |
image |
Use an existing image |
ports |
Map host and container ports |
volumes |
Persist data across container restarts |
networks |
Define custom networks (optional) |
depends_on |
Specify service dependencies |
Real-World Example: WordPress + MySQL
yamlversion: ‘3.8’
services:
wordpress:
image: wordpress
ports:
– “8080:80”
environment:
– WORDPRESS_DB_HOST=db
– WORDPRESS_DB_USER=root
– WORDPRESS_DB_PASSWORD=root
– WORDPRESS_DB_NAME=wordpress
depends_on:
– db
db:
image: mysql:5.7
environment:
– MYSQL_DATABASE=wordpress
– MYSQL_ROOT_PASSWORD=root
volumes:
db_data:
Run with:
bash container runtime-compose up
Benefits
-
One command deployment
-
Simplified networking
-
Reusable config
-
Good for local development and CI/CD
What is Docker Swarm?
Container runtime Swarm turns a group of container runtime hosts into a single, virtual container runtime engine. It allows you to:
-
Deploy containers across multiple machines
-
Achieve high availability, load balancing, and scaling
-
Use simple
container runtime-compose.ymlfiles for production deployment
Key Component :
| Component | Role |
|---|---|
| Node | A machine (VM or physical) part of the Swarm |
| Manager Node | Manages the cluster, decides what runs where |
| Worker Node | Executes tasks assigned by the manager |
| Service | A definition of a container (like nginx, mysql, etc.) |
| Task | A single running container instance part of a service |
| Overlay Network | Allows containers to talk across nodes |
Swarm vs Standalone
| Feature | Docker Engine | Docker Swarm |
|---|---|---|
| Deployment Scope | Single machine | Multiple machines (cluster) |
| Scalability | Manual | Built-in scaling |
| High Availability | No | Yes (with multiple managers) |
| Load Balancing | No | Yes |
| Orchestration | No | Yes |
Basic Commands
1. Initialize a Swarm (on manager node):
bashdocker swarm init
2. Join a Worker Node:
bashdocker swarm join --token <worker-token> <manager-ip>:2377
3. Check Nodes:
bashdocker node ls
Deploying a Service in Swarm
bashdocker service create --name webapp -p 80:80 nginx
Service scaling:
bashdocker service scale webapp=3
List services:
bashdocker service ls
Check running tasks:
bashdocker service ps webapp
Remove a service:
bashdocker service rm webapp
Using Docker Compose with Swarm
Use container runtime stack to deploy multi-container applications:
-
Create a
container runtime-compose.yml -
Deploy using:
View stack services:
bashcontainer runtime stack services mystack
Benefits
-
Built-in container runtime tool (no need to install Kubernetes)
-
Simple to set up and use
-
Lightweight and efficient
-
Production-ready orchestration
-
Load balancing and auto-healing
For More Learn Click Here
For more related references Click Here
Next