“In this Git Distributed Version Control System Part-5, we will dive into advanced Git operations…”

Introduction (SEO Optimized)
Git is not just a version control tool – it is the backbone of modern software development. The Git Distributed Version Control System (DVCS) allows developers to track changes, collaborate seamlessly, and maintain clean project histories.
In earlier parts of this Git series, we covered the basics of repositories, commits, and branching. Now, in Git Distributed Version Control System Part-5: Advanced & Effective Guide, we will dive into advanced Git operations that every developer must master for professional workflows.
Here, you’ll learn about:
-
Git Merge vs Git Rebase → Choosing between safe history and clean history
-
Git Cherry-pick → Applying selective commits to other branches
-
Git Stash → Saving your unfinished work without committing
-
Git WorkTree → Managing multiple branches simultaneously
-
Git Squash Commits → Cleaning up messy commit histories
Whether you’re a beginner stepping into real-world projects or a professional working in large teams, these commands will help you write better code, collaborate smoothly, and maintain an error-free project history.
Git Distributed Version Control System Part-5: Advanced & Effective Guide
In this Git Distributed Version Control System Part-5, we will dive into advanced Git operations like merge, rebase, cherry-pick, stash, worktree, and squash commits. These commands are essential for maintaining clean, professional, and effective workflows in software development.
The Git Distributed Version Control System is one of the most powerful tools for developers. In earlier parts, we learned the basics of Git such as repositories, commits, and branching.
In this Part-5, we move to the advanced Git commands that every developer must master for clean, safe, and professional workflows. Here, you will learn:
-
The difference between Git Merge and Rebase
-
How to use Git Cherry-pick for selective commits
-
Saving work in progress with Git Stash
-
Managing multiple branches using Git WorkTree
-
Cleaning commit history with Git Squash
Whether you are working solo or in a large team, these Git commands will help you handle real-world scenarios more effectively, safely, and smartly.
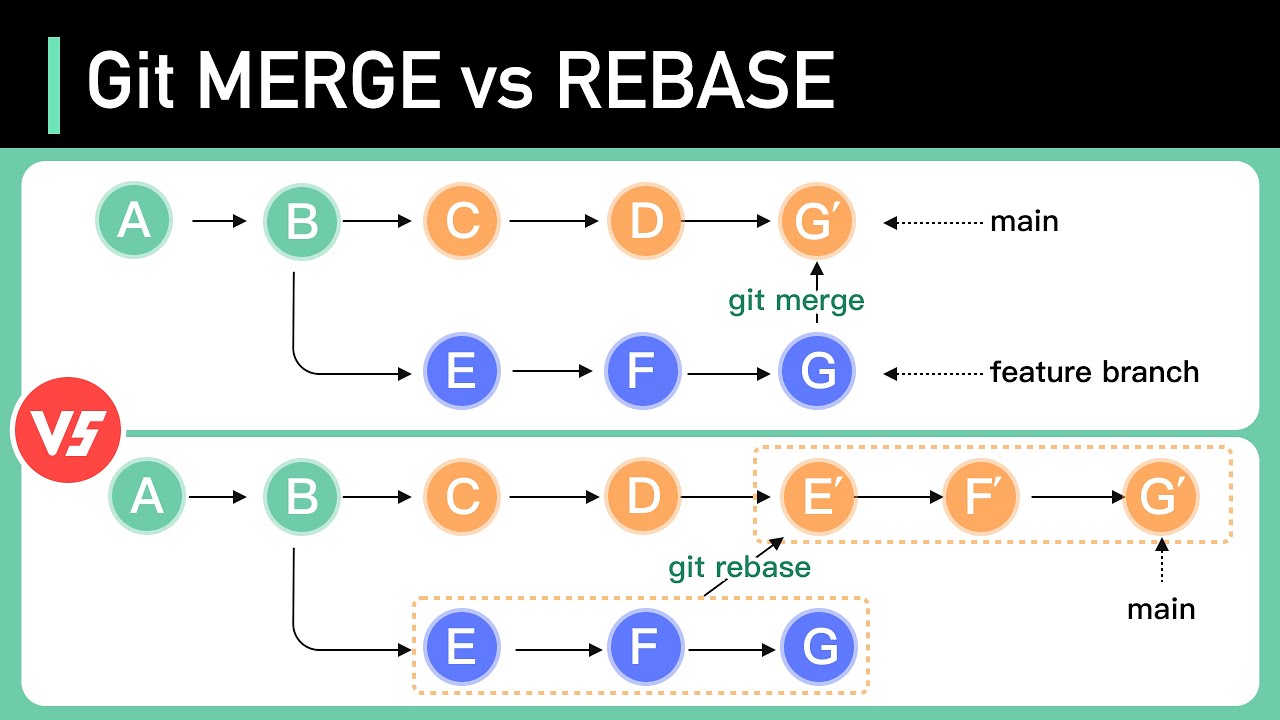
1. Git Merge vs Git Rebase
Git Merge
git merge combines changes from one branch into another.
Syntax:
Advantages: Maintains full history, safe and simple.
Disadvantages: History may become cluttered with merge commits.
Git Rebase
git rebase reapplies commits from your branch on top of another branch.
Syntax:
Advantages: Creates a cleaner, linear history.
Disadvantages: Risky on public branches as it rewrites history.
Key Differences
| Feature | git merge | git rebase |
|---|---|---|
| History | Preserved | Linear (rewritten) |
| Merge commit | Yes | No |
| Safe for teams | Yes | No |
| Best for | Preserving history | Cleaning history before merging |
2. Git Distributed Version Control System: Cherry-pick Command
The git cherry-pick command applies specific commits from one branch to another.
Syntax:
Best for: Hotfixes, selective updates.
Risk: May cause conflicts if dependent commits are missing.
3. Git Distributed Version Control System: Stash for Saving Work
git stash temporarily saves uncommitted changes without committing them.
git stash is like a temporary storage box for your changes.
Syntax:
Best for: Switching tasks without losing work.
Risk: Forgetting to reapply stash or losing it.
4. Git Distributed Version Control System: WorkTree for Multiple Branches
git worktree lets you check out multiple branches in different directories simultaneously.
git worktree allows you to work on multiple branches at the same time.
Syntax:
Advantages: Parallel development, hotfix handling, saves time.
Risk: Requires careful directory management.
5. Git Distributed Version Control System: Squash Commits for Clean History
Squash is used to combine multiple commits into a single one, creating a cleaner commit history.
If your branch has many small “WIP” commits, you can squash them into one meaningful commit before merging.
Syntax:
Disadvantages: Rewrites commit history, avoid on shared branches.
Conclusion
In this Git Distributed Version Control System Part-5, we explored advanced commands:
-
Merge vs Rebase
-
Cherry-pick
-
Stash
-
WorkTree
-
Squash commits
These Git techniques make collaboration smoother and keep your project history clean, safe, and effective.
In this Git Distributed Version Control System Part-5, we learned advanced Git techniques:
-
Merge vs Rebase → Safe history vs Clean history.
-
Cherry-pick → Selective commit transfer.
-
Stash → Save work in progress without committing.
-
WorkTree → Work on multiple branches simultaneously.
-
Squash → Combine commits for a clean history.
These commands are powerful, safe, and effective when used correctly. They help developers maintain professional workflows in real-world projects.
With this, you now have a strong command over advanced Git operations that every professional developer uses in real-world projects.
you want to know more blog Click Here