Introduction
Git has become the backbone of modern software development, providing developers with powerful version control to manage projects efficiently. Whether you are working solo or in a large team, Git ensures that every change is tracked, every version is stored, and collaboration becomes smooth.
However, setting up for the first time often comes with challenges—incorrect configurations, authentication issues, or confusion with commands can make beginners feel stuck. That’s why understanding the setup process is essential.
In this blog, we’ll break down the 3 easy steps to overcome common setup challenges and help you take full control of your coding environment. With the right setup, you’ll save time, avoid errors, and confidently manage your projects with Git.
Setting up a New Code Repository
- Install GIT
- To check Wether GIT is installed
- Configure GIT – This is important for version control system, as each commit uses this information.
Note – Use global to set username and e-mail for every repository on your computer. If you want to set username/email for just the current repo, you can remove Global.
- Creating GIT folder – Now let’s create a new folder for our project.
mkdir folder_name (mkdir stands for make a new directory)
cd folder_name ( cd changes to the current working directory.) - Initialize GIT – Once you have navigated to the correct folder, you can initialize GIT on that folder :
- Open Path – Once you initilized Git, u have to open the directory in the code editor (can use any code editor like – vs code, Eclipse etc.) and can create project files (for example add.java)
Git Staging Environment
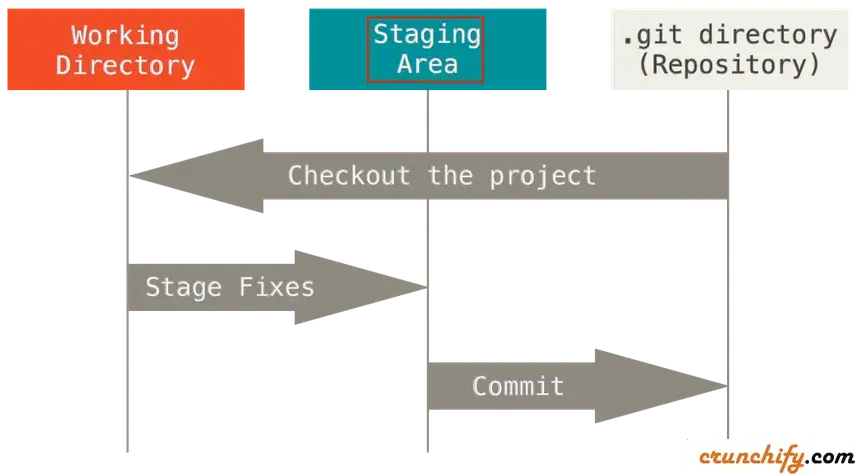
The files that you created on the editor in the directory are ready to be committed to the repository.
Adding more than one file
lets add two files this time at once. Create 2 more files in the editor lets assume the name as divide.java and multiply.java
Now lets add both of them into the repository
using –all instead of file name will stage all files from the project.
to check weather files are staged or not we use status.
Git Commit
This commit is like saving your work. When you make changes to your code, you can “commit” those changes to create a new version of your project. This helps you keep track of what you’ve done and allows you to go back to previous versions if needed.
NOTE – While using commit, we should always include a message.
By adding a clear message to each commit, it is clear for yourself and others to see what was changes and when.
Git Commit Log
To view the history of commits for a repository, you can use the log command:
Conclusion
Setting up might seem tricky in the beginning, especially when you face challenges like configuration issues, version mismatches, or authentication errors. However, with the right steps and a clear understanding, it becomes one of the most powerful tools for developers.
By following the 3 simple steps we discussed, you not only gain control over your project versions but also build a strong foundation for collaboration and efficient code management.this is more than just a version control system—it is the backbone of modern software development, enabling teams across the globe to work together seamlessly.
Remember, consistency in using commands, maintaining proper branching strategies, and regularly pushing updates can save you from unexpected challenges. The more you practice, the more confident you will become in handling advanced workflows.
In the long run, mastering it will not only simplify your project management but also enhance your credibility as a developer. Whether you are working on personal projects, contributing to open-source, or collaborating in a professional team, that your code remains safe, structured, and accessible.
want to read more git content –Click Here