1. Why Upgrading Kubernetes Matters
Upgrading kubernetes has many organizations delay upgrades because they fear breaking production workloads. However, avoiding updates can be riskier. Here’s why upgrades are important:
-
Security Patches: Each release includes fixes for known vulnerabilities. Running outdated versions can expose your cluster to security risks.
-
New Features: Upgrades often bring new APIs, scheduling strategies, and performance improvements.
-
Deprecation Handling: Older APIs and features are eventually removed; upgrading ensures your workloads remain compatible.
-
Support Lifecycle: Kubernetes maintains a limited support window (typically for the last three minor releases). Staying current ensures official support and security fixes.
2. Understanding Upgrading Kubernetes Versioning
Kubernetes follows Semantic Versioning:
-
MAJOR — Rarely changes; breaking changes may occur.
-
MINOR — Released every ~4 months; may introduce new features and deprecations.
-
PATCH — Released frequently for bug and security fixes.
Example: v1.29.3
-
1= Major version -
29= Minor version -
3= Patch release
Kubernetes supports only the latest three minor releases. For example, if the latest is 1.30.x, only 1.30, 1.29, and 1.28 are supported.
3. Preparing for a Upgrading Kubernetes
Upgrading is not just about running a single command. It requires careful preparation.
a. Review Release Notes
Before upgrading, read the official Kubernetes release notes.
Check:
-
API deprecations
-
Changed defaults
-
New features you might want to adopt
b. Backup Your Cluster
Always back up critical data:
-
etcd backup (stores Kubernetes cluster state)
-
Persistent volumes (if required)
-
Custom resource definitions (CRDs)
Example command for etcd backup (on control plane):
c. Check Deprecations
Run:
kubectl deprecations
(using the kubectl-deprecations plugin) to identify outdated API usage.
d. Test in a Staging Environment
Never upgrade production first. Clone your production workloads into a staging/test environment and upgrade there first.
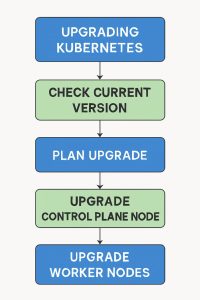
4. Step-by-Step Kubernetes Upgrade Process
The upgrade steps vary depending on your setup (kubeadm, managed service like EKS/GKE/AKS, or custom install).
Here, we’ll focus on kubeadm-based clusters, as it’s the most common self-managed method.
Step 1: Upgrade kubeadm
On each control plane node:
Check the installed version:
Step 2: Plan the Upgrade
sudo kubeadm upgrade plan
This shows:
-
Current version
-
Available versions
-
Upgrade paths
-
Warnings about deprecated APIs
Step 3: Apply the Upgrade
On the first control plane node:
Replace v1.30.0 with your desired version.
Step 4: Upgrade kubelet and kubectl
After upgrading the control plane, update the node components:
Step 5: Upgrade Worker Nodes
On each worker node:
Drain nodes before upgrading:
After upgrading:
kubectl uncordon <node-name>
Step 6: Verify Cluster Health
kubectl get nodes

kubectl get pods --all-namespaces
All nodes should be Ready, and pods should be running without errors.
5. Post-Upgrade Validation
After upgrading:
-
Check API Versions
Ensure deprecated APIs are not in use.
-
Run Workload Tests
Deploy sample apps or run integration tests to confirm workloads function correctly. -
Monitor Logs
Check kubelet, kube-apiserver, and application logs for errors.
6. Best Practices for Safe Upgrading Kubernetes
-
Upgrade One Minor Version at a Time
Skipping minor versions can cause compatibility issues. -
Always Backup etcd First
If something goes wrong, you can restore the cluster state. -
Automate Testing
Use CI/CD pipelines to test workloads in upgraded clusters before production rollout. -
Leverage Maintenance Windows
Plan upgrades during low-traffic hours. -
Keep Add-ons Updated
Update CNI plugins, Ingress controllers, and monitoring tools after Kubernetes upgrades. -
Use Managed Services When Possible
Platforms like EKS, AKS, and GKE simplify upgrades by automating much of the process.
7. Common Pitfalls and How to Avoid Them
| Pitfall | How to Avoid |
|---|---|
| Skipping versions | Upgrade sequentially and follow release notes |
| Ignoring API deprecations | Use tools to scan workloads for deprecated APIs |
| Not draining nodes | Drain nodes to avoid workload disruptions |
| Forgetting add-ons | Upgrade networking, storage, and monitoring components |
| No rollback plan | Keep etcd backups and test restore procedures |
8. Final Thoughts
Upgrading Kubernetes might seem daunting, but with the right preparation and strategy, it becomes a smooth and predictable process.
Think of upgrades as regular maintenance for your cluster — much like updating your operating system to fix vulnerabilities and improve performance.
By staying current, you not only keep your cluster secure but also position your team to take advantage of Kubernetes’ latest features and innovations.
“Before upgrading Kubernetes, you may want to read our Kubernetes Networking Basics guide.