Working
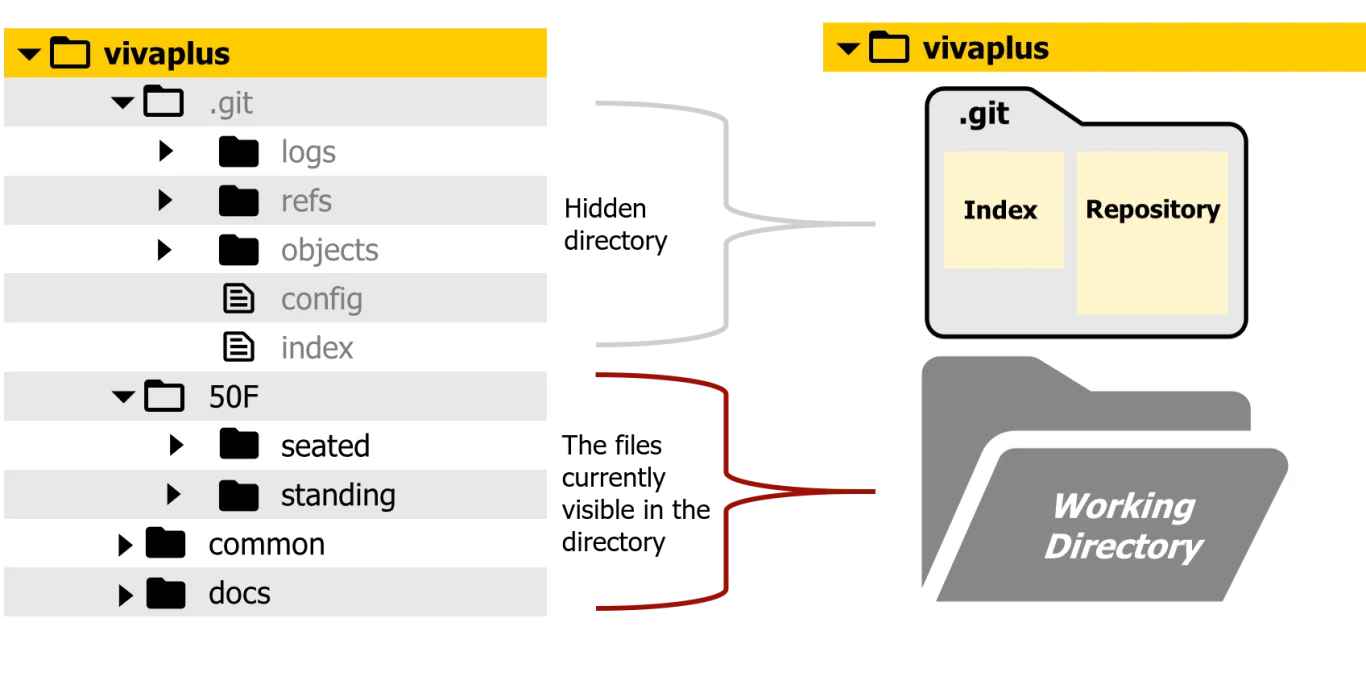
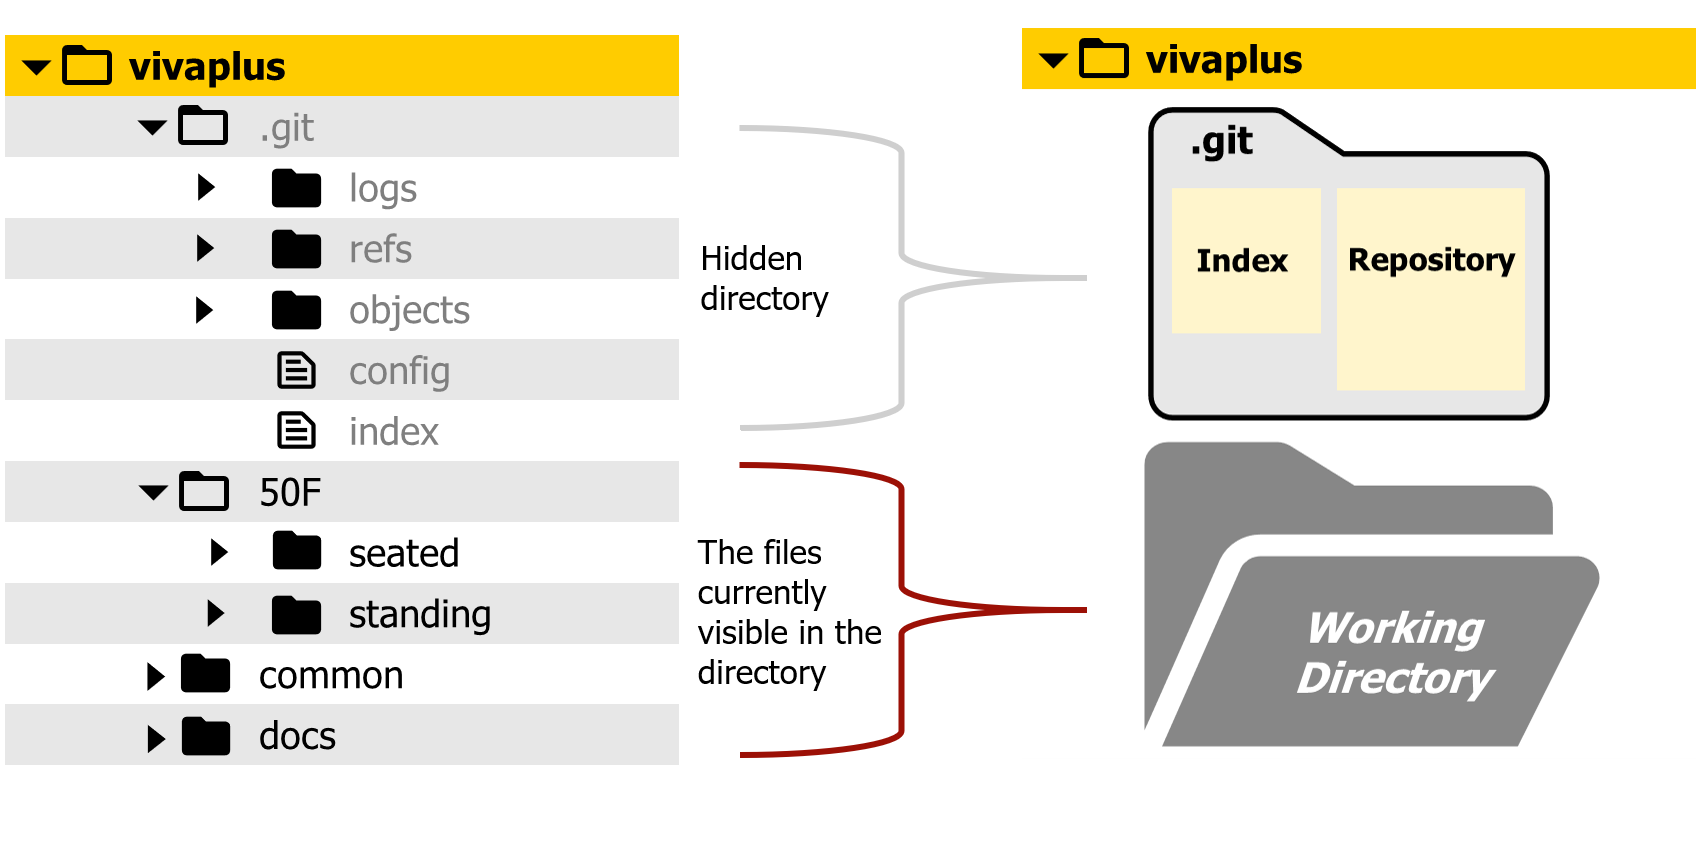
The (or tree) in Git refers to the on your local machine where the actual files and folders of your project are located. It is where you create, edit, and delete files during the course of your development.
In Git, the working is a key part of the workflow, and it interacts with two other areas: the staging area (index) and the repository (committed history).
Understanding how the working fits into Git’s structure is essential for version control.
Key Concepts of the Working in Git:
1. The Three Git Areas
In Git, files move through three primary areas as they evolve:
- Working: The actual files on your local machine where you make changes.
- Staging Area (Index): The place where you add changes before committing them
- Repository (.git folder): The location where committed snapshots of the project history are stored.
Here’s how these areas work together
- You add the changes to the staging area when you’re ready to commit.
- You commit the staged changes to the repository
2. Making Changes in the Working
- When you create, modify, or delete files in the working, Git recognizes these changes as untracked or modified.
- reflects the current state of your project, but it does not yet represent what will be committed until you explicitly stage the changes.
git status
- Example output:
On branch main
Changes not staged for commit:
(use “git add <file>…” to update what will be committed)
deleted: file2.txtUntracked files:
(use “git add <file>…” to include in what will be committed)
newfile.txt - File States in the Working:
- Untracked: New files that Git is not tracking yet (not added to the staging area).
- Modified: Files that have been changed but not yet staged.
- Deleted: Files that have been deleted but the deletion hasn’t been staged yet.
3. Staging Changes
Once you’ve made changes in this , you typically move files to the staging area if you want to include them in the next commit. This ensures that only specific files or changes are committed.
- To move changes from to the staging area:
git add <file>
- or to stage all changes:
git add .
4. Committing Changes
Once changes have been staged, the next step is to commit them to the repository. This moves the changes from the staging area into the Git history.
- To commit changes:
git commit -m “Commit message”
At this point, the repository is updated.
5. Working Clean vs. Dirty
- A clean means that there are no changes that Git doesn’t know about—nothing is untracked or modified.
6. Restoring the Working to a Previous State
- Undo changes to a specific file:
git checkout — <file>
- Discard uncommitted changes:
git restore <file>
- Reset the entire working to the last committed state:
git reset –hard
7. Ignoring Files in the Working
• • You can add these files to a .gitignore file, which tells Git to ignore them when checking the status or adding changes.
Example .gitignore file:
# Ignore all .log files
*.log# Ignore build/
build/
Conclusion
Mastering the directory in Git is the foundation of building smooth and efficient workflows. By following this 7-step guide, you not only understand how Git tracks changes but also gain the confidence to manage your code with clarity and control. A well-maintained directory reduces errors, simplifies collaboration, and keeps your projects organized—whether you’re solo or within a team.
Efficient Git workflows are not about memorizing commands; they are about adopting best practices that save time and boost productivity. When you know exactly how your directory interacts with the staging area and repository, you unlock the real power of Git. Start applying these steps in your daily development routine, and soon you’ll find Git not just as a version control tool, but as a productivity partner in your coding journey.
Want to visit official website –Click here
check out our full Git tutorial –Click Here